|
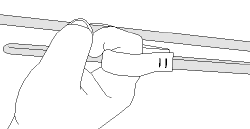
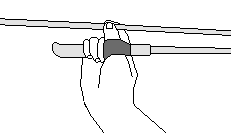
The Basics Daryl Hrdlicka Jeffers Petroglyphs Historic Site January 17, 2003 When you first try throwing with the atlatl, you may be disappointed with the results. But don't give up -- while everyone's style may vary, there are some common factors. Once you learn these it's only a matter of practice. To use an atlatl effectively, you need to know more than just how to throw it. It's like using a bow and arrow -- if you don't do everything right before you let go of the bowstring, you're not going to hit the target. PART 1: PREPARATION There are five steps involved in the preparation stage. You need to know how to grip the atlatl, how to hold the dart, how to stand, how to aim, and how to cock your arm. 1. Gripping the Atlatl Atlatls come in a variety of shapes and sizes, but there are only 4 basic grip styles. The grip you use will depend on your atlatl. For all of these, the palm of your hand goes on the back of the atlatl (the side away from the peg). 
 Hammer Grip. Some atlatls have a dart rest (a ledge or holder for the dart shaft). Hold this style like a hammer, wrapping your fist around it. Since you don't grip the dart at all, you'll need to keep the atlatl tilted so the dart stays on and in contact with the peg.  If different grip styles work on your atlatl, use whichever feels most comfortable. I prefer the thumb grip; other people find the knuckle grip works better. It's up to you. No matter which grip style you use, it is important to hold the atlatl tightly enough so it stays in your hand during the throw, but loosely enough so that your wrist can move freely. You'll get a feel for it. 2. Gripping the Dart This is a simple but vital step -- if you're not holding the dart right, it won't release properly. Start off by nocking the dart (putting the atlatl peg in to the dimple on the end of the dart). The easiest way I've found to do this is to put the tip of the dart on the ground so the shaft can't wobble, then lift the atlatl up and put the peg in the nock. Let the shaft rest on top of your knuckles and grip the dart. You need to hold it tightly, but make sure your fingers aren't over the top of the dart. If they are, the dart can't come free. Make sure your fingers are on the sides of the dart. You also need to hold the dart tightly against the atlatl peg. If they don't stay in contact through the entire throwing motion it won't work. To check your grip, lift the dart off the ground with the point down. If it doesn't come away from the peg, you're holding it correctly. 3. The Stance The stance may feel awkward at first, but you'll get used to it. Point your left foot at the target (if you're right-handed) and put your right foot at an angle to it, about a shoulder's-width back. You should be comfortable and balanced. Turn your body sideways (in line with your left foot) and turn your head to look at the target. You're set. If you want, you can also point your left arm at the target. This helps your aim and balance but isn't essential. It does look good, though. 4. Aiming To aim, bring your grip hand up by your ear. You should be able to sight along the shaft effectively enough to make sure it's pointing at the target. 5. Cocking Your Arm To cock your arm, bring it straight back as far as far as you comfortable can while keeping the dart shaft lined up with the target. Unless you're a powerful thrower, tip your hand back so that the point of the dart rises up a few inches. This will give your throw an arc, making it travel farther. Make sure you don't twist your wrist on the way back. This points the dart off to the side and while you can straighten it out during the throw, you'll lose a lot of speed and energy in the process. It's usually a good idea to pause at this point, just to collect yourself and focus. PART 2: THE THROWING MOTION Throwing an atlatl is very similar to throwing a baseball: if you just want it to get to the target, you simply flip your wrist. If you want to deliver the equivalent of a 95 mph fastball, though, you have to use your entire body. Watch a professional pitcher and you'll see what I mean -- the pitching motion actually starts with his feet. This is known as "cracking the whip". By starting your throw as far away from the "tip" (the baseball or the dart) as possible, you maximize the final release speed. To "crack the whip" with an atlatl, you should:
Steps 2, 3, and 4 should be one fluid movement. Practice them without a dart until you get used to it and can do it smoothly. Don't worry about releasing the dart. As long as you're holding it right it will come free on its own at the proper moment. You don't need to do all these steps. You can get the dart a surprising distance simply by flipping your wrist, but every extra motion adds speed and power. By sliding your arm forward before the wrist snap, you'll easily double your speed. By stepping into it first, you'll be throwing as powerfully as you can. But don't worry about throwing it hard or fast at first -- just concentrate on throwing it smoothly. The speed and power will develop. ADVICE: When practicing, you should always use the same atlatl with a matched set of darts, throwing at a target a fixed distance away (15 yards is usually a good start). Once you are comfortable with this setup, you can change things (increased range, different targets, different atlatl, etc.). But whatever you do, only change one thing at a time! Stay with the new setup until you're comfortable with that as well. As you become more experienced, you'll be able to adapt to new situations without even thinking about it. You can also work on changing and refining your throwing technique. CONCLUSION: To paraphrase "Illusions", everything in this article may be wrong. There are some very good throwers out there who don't do a lot of what I'm recommending and vice-versa. This is not the only way to throw an atlatl! But in my experience as an instructor, this is the easiest way to learn the basics. These tips will help you get started, but it is only the beginning. In the end, throwing the atlatl is like anything else -- it takes practice to become good at it. But if you stay with it, in a short time you'll find your speed, power, and accuracy increasing. Good luck, and good throwing! |

