This information is from the German site Speeerschleuder.de. They have no English page, so I attempted to translate it myself.
I have not gotten their permission for this yet, but am trying to do so. The original page is here.


The Speerschleuder

Speerschleuder, Carved Hook


A speerschleuder serves as an extension of the throwing arm, increasing power and distance. Wood is the most suitable material for it, if you want to replicate prehistoric models. A rusty nail crosswise through a roofing slat is not a safe solution.

Suitable wood is easily available. The branch should be light and durable with a length of 50 to 70 centimeters (19.5 - 27.5 inches). A diameter of approximately 30 to 40 millimeters (1 - 1.5 inches) fits well in the hand. In my opinion, ash is probably the best wood to use for a speerschleuder. Heavy hardwood, such as beech or oak, should not be used. To start with, hazelnut wood would also work.

A speerschleuder can be made in a number of ways. The hook can be an insert made of horn and the handle can be covered with leather straps. The basic prehistoric hook ends are beautiful small works of art. There are multiple animal representations, like a wild horse. They almost look as though they grew that way from a single antler. Here is my first speerschleuder, carved from a single piece of wood.

As you can already see, this area contains a number of possibilities for experimentation, which get even larger when you begin building the speere.

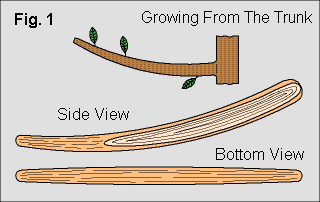
For speerschleuders with a simple carved hook, I prefer a naturally curved branch. The thicker end should be the hook end, with the thinner end for the handle. The reason for this is simple. In order to carve out the hook, a lot of wood must be removed from the branch. Doing this to the thinner end would make the cross section too weak.

After removing it from the tree, the branch must be carefully shaped and dried so it does not split (as I found out, trying to carve one too soon).

Using a sharp tool, shave both sides of the branch going back to the thicker end so it ends up only as wide as the thinner end (see Figure 1).

Finding and Shaping the Branch

Cutting the Hook

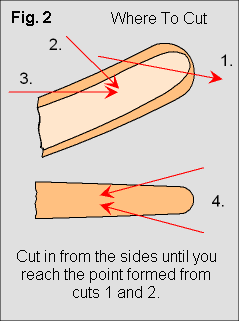
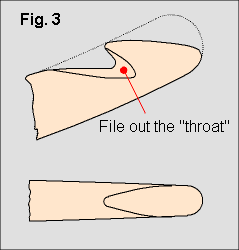
Rough-cutting the the hook only takes a few cuts (Figure 2). Afterwards, you can use a knife to round and taper the end. With a round file, smooth out the notch under the hook (Figure 3) and finish shaping and smoothing the hook with emery paper.

Finally, the entire speerschleuder can be sanded and afterwards should definitely be oiled. Simply dip a rag in the oil of your choice (shank oil, linseed oil, shoe polish, etc.) and apply it to the wood, wiping off any excess. This will prevent the wood from drying out and cracking and will keep moisture from getting into the wood.

Shaping the Hook

Wrist strap: this speerschleuder is made without a wrist strap. If you have a problem with it flying out of your hand when you throw, at least the speere goes flying first (...and perhaps this is how the Aborigines invented the boomerang? ; -) ). If the speerschleuder is fastened to your wrist, it may strike you in the kneecap (or even worse) if you accidently let go while you throw.

Closeup Photos of the Hook


Atlatl Designs | Home